
The focus of this article is to provide step-by-step instructions for an alternative QA method for Firebase+GTM+Google Analytics Implementations on Mobile Applications. There are several methods that can be used and in this article we will highlight the advantages and disadvantages of each method and then provide a deep dive into our proposed alternative method. We will also detail the most common roadblocks and, of course, solutions.
Overview
- Advantages and disadvantages of QA methods
- Using the Firebase DebugView to QA in-app events.
- Using a proxy to surface Google Analytics requests which capture the events and parameters.
- Using a proxy to surface image requests which capture the events and parameters.
- Step by step guide to using image requests for Firebase in-app events QA
- Troubleshooting
Before we begin, let’s first make sure the following prerequisites are met:
- The Firebase SDK (Android | iOS) is installed on the app.
- Your app has been added to your Firebase project in the Firebase console.
- Firebase Analytics has been added to your app (Android | iOS).
- Firebase DebugView has been enabled inside the app.
- Google Tag Manager (GTM) has been added to the app.
- The GTM preview mode has been enabled inside the apps. (Android | iOS)
- Developers have logged the custom events requested.
Finally before pushing GA tracking live, you need to ensure that the events implemented by the developers fire at the expected moments with the correct values in each parameter.
1.0 Advantages and drawbacks of QA methods
1.1 Using the Firebase DebugView to QA in-app events
The first, and potentially easiest method, to ensure custom events fire at the expected time with correct values for each parameter would be to use the DebugView in Firebase.
Advantages:
- The number one hurdle in completing a QA of an app implementation is that apps cache requests and send them in batches by sending as few calls as possible to conserve battery life and to avoid data loss due to lost network connectivity. This makes it more difficult to determine if an event fired at the right moment. You won’t have this issue with the DebugView, as each event is fired immediately.
- You can easily read the parameter values in the user friendly interface.
Drawbacks:
- The biggest drawback of this method is that you cannot QA product information on any enhanced ecommerce request. Therefore you won’t be able to ensure your view_item_list, select_content, add_to_cart, remove_from_cart, begin_checkout and ecommerce_purchase have the correct product IDs, names, prices, quantities, indexes, lists or any of the product scoped custom dimensions/metrics.
1.2 Using a proxy to surface Google Analytics requests which capture the events and parameters
Another QA option is to implement the Google Analytics tracking in GTM and use the GTM preview mode in the app to look at the Google Analytics requests firing for each event. To do this you need to use a proxy to route these requests through your computer.
Advantages:
- This method allows you to validate the values in each product related parameter, for any enhanced ecommerce event.
- It is the most robust way to ensure that the Firebase implementation will work for your intended Google Analytics implementation because you can see the final values on the actual request sent through to GA.
Drawbacks:
- As mentioned, apps batch requests together, therefore it is difficult to validate if an event fired at the desired moment.
- On Android, we’ve seen many instances of SSL Handshake failures because the app does not recognize the Charles/Fiddler certificate related to Google Analytics requests. Due to this Certificate error, it’s not possible to check what parameters are passed on the request attempt.
- Moreover, as the requests are batched together it can be difficult to clearly distinguish between these events. Charles does separate the parameters in key value pairs however it does not decode the values or separate the events. In this case, you will need to use a separate batch decoder tool.
1.3 Using a proxy to surface image requests which capture the events and parameters
An alternative to the relatively well known methods above is to configure GTM to fire an image request for each Firebase event inside the app. This resolves some of the biggest issues of those methods. The image request will include parameters for each value sent with the event, including the event name itself.
Advantages:
- This method will allow you to validate the values in each product related parameter, for any enhanced ecommerce event.
- Requests are not batched together and you can easily read the parameter values in the Charles (or Fiddler) interface, without having to use a separate decoder tool.
- This type of request does not fail due to the proxy ssl certificate and can be used both on Android and IOS.
- The debugging process is identical for Android and IOS (unlike the process for using the DebugView which is different for the 2 operating systems)
Drawbacks:
- The biggest drawback of this method is that you will not see the final request sent to GA as this method only surfaces the Firebase events, with its parameters and values and therefore you cannot guarantee that the event data will appear in GA as expected. We’ve seen several instances where, although all of the information was included with a Firebase custom event, the Google Analytics request would drop the product or transaction information because a metric or dimension did not match the format GA was expecting.
2.0 Step by step guide for using image requests to QA Firebase in-app events
2.1 GTM Configuration
The first step in surfacing Firebase events and their parameters is to configure GTM to send an image request with the required parameters and their values attached. Here are the steps to do so:
-
- Enable the built-in variables App ID and Event Name
- Create a variable for each key parameter required. These can be either standard event parameters or custom parameters.
- Standard event parameters
-
-
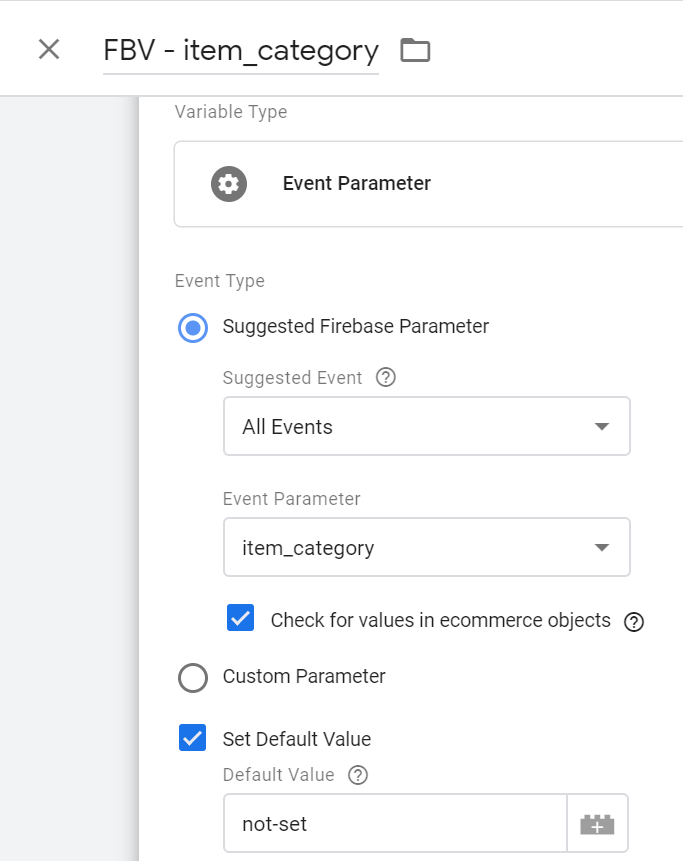
- Under Variable Type choose “Event Parameter”.
- Under Event Type choose “Suggested Firebase Parameter”.
- Choose a parameter from the drop down list.
- Check the box for “Check for values in ecommerce objects”.
- Set a default value of “not-set” which will be sent through in case there is no value found for that parameter on an event. This will ensure you do not get an error in your request when a parameter is either empty or missing from the Firebase event.
-
- Custom event parameters
Custom parameters are necessary to surface the following:
-
-
- Custom data that you would like to send to GA, such as data for custom dimensions or custom metrics
- Data relating to more than one product. For example, in the case of a view item list event, data about all products displayed on the screen needs to be sent to GA. The previously shown standard event parameter configuration would only pick up the category for the first item, whereas other item categories would be ignored. In order to surface product information for more than a single product you would need a custom event parameter key for each item parameter.Here are the steps for configuring custom event parameter variables in GTM:
-
-
-
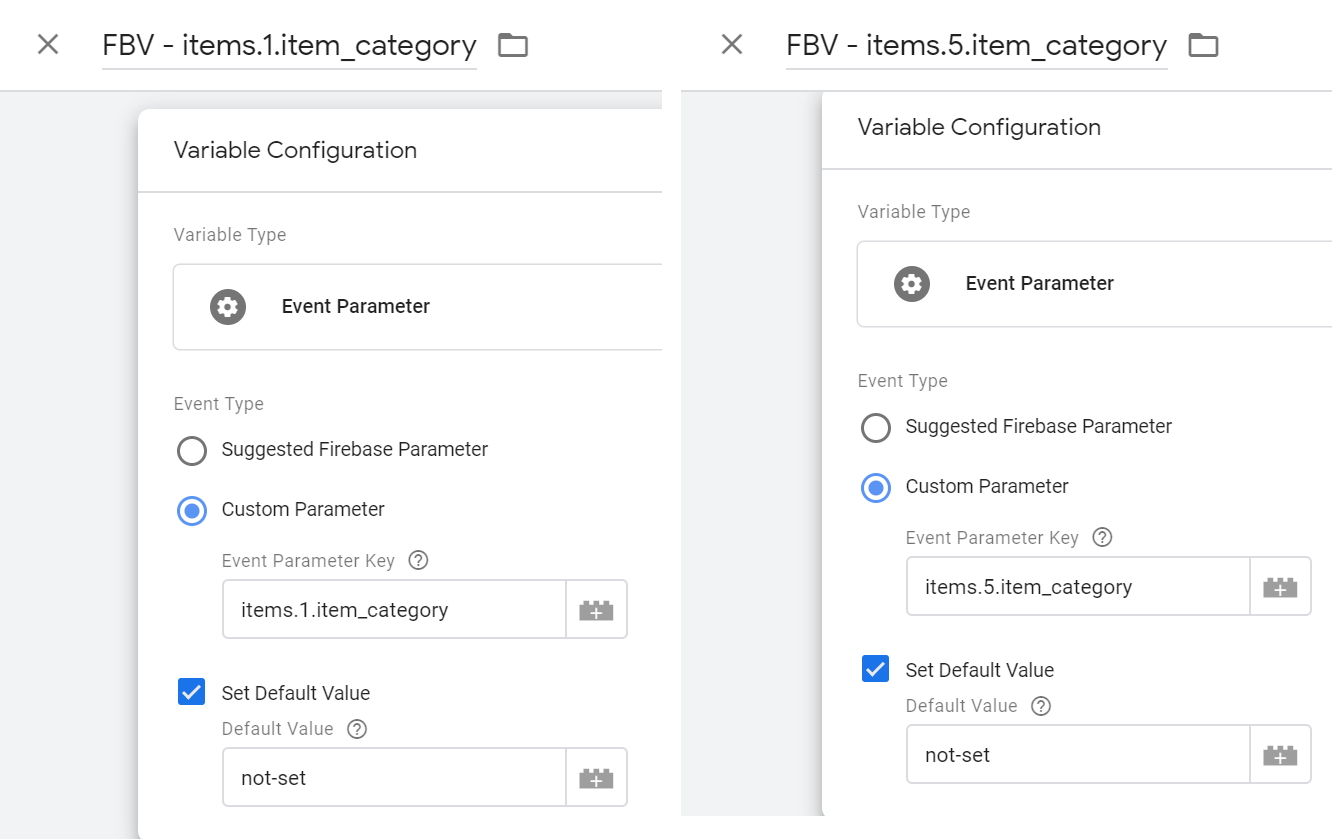
- Under Variable Type choose “Event Parameter”.
- Under Event Type choose “Custom Parameter”.
- Introduce your event parameter key.
-
For hit, session or user scoped custom dimensions or hit scoped metrics you need to enter the exact name the developers used on the Firebase events. For example, a hit scoped dimension might be “transaction_payment_method”. In your GA requests this could be mapped to custom dimension 1 for example.
For both standard and custom product scoped dimensions and metrics the story is a little different. Information about each product is pushed into individual bundles. In order to read this information you need to use GTM’s preferred format for reading an array, followed by the dimension or metric nested inside the bundle that you are interested in. For example: items.0.item_id, items.0.dimension4, items.1.item_category, item.5.item_category etc.
-
-
- You should also set a default value of “not-set”.
-
![]()
IMPORTANT NOTE:
Select Content Events
The select content event can only ever include information about one product and depending on how developers implement this event the item information may not be visible in the custom parameters you have configured in GTM. For example the custom parameters which are configured for items in an array, such as item.0.item_category, may not show the information you are expecting as only a single item is included with this event.
Therefore it is important that you have configured (and attached to the image request) both the standard parameters (using Suggested Firebase Parameter), such as item_id for item information and the custom parameters, such as items.0.item_id, in your image request. The latter being useful when the event contains information relating to more than one product.
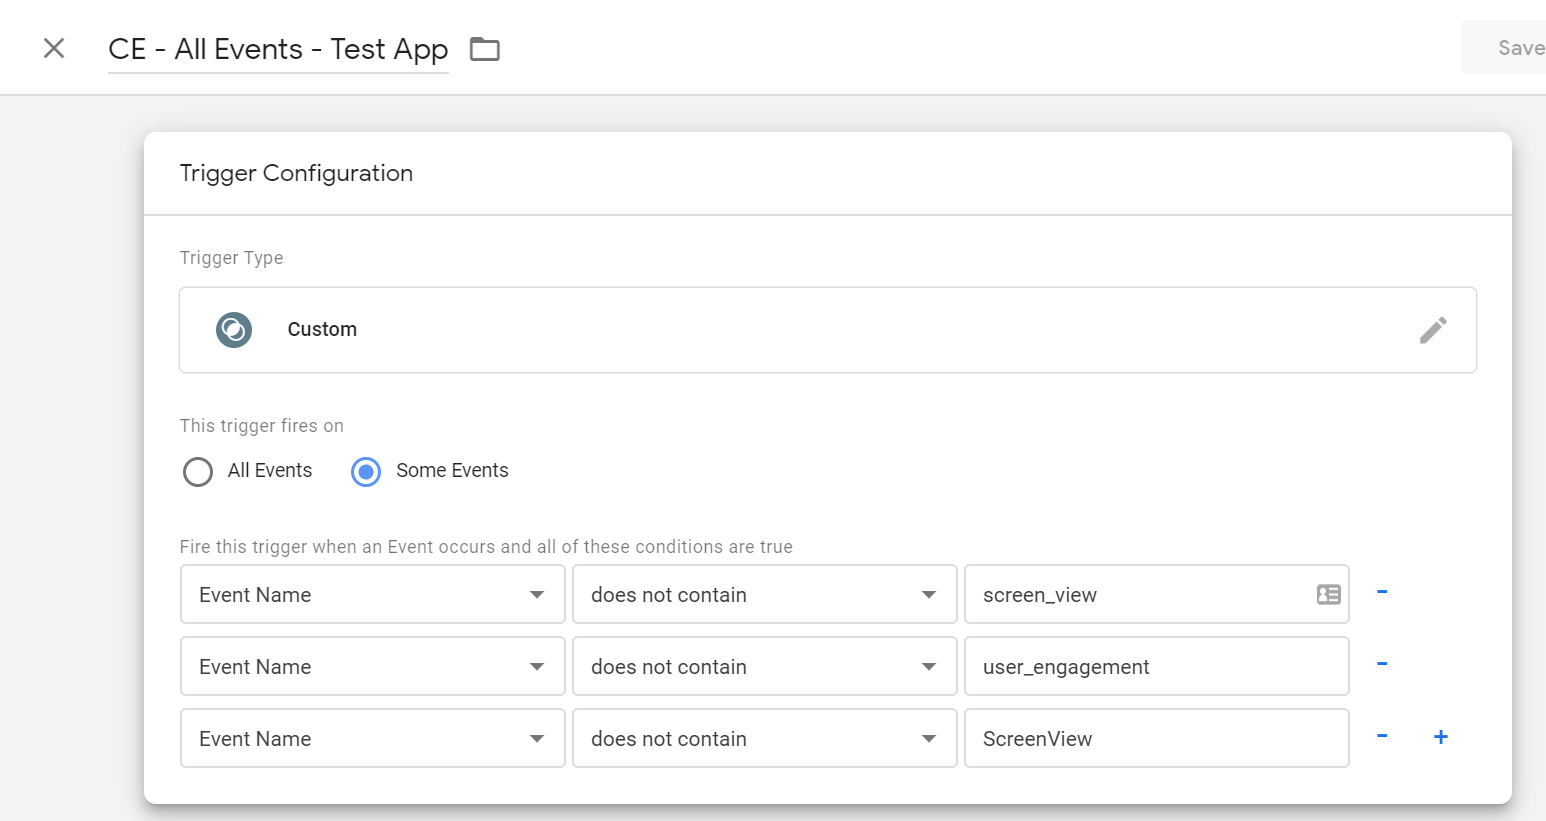
- Create the GTM trigger
To keep your logs clean with only your required events you should prevent the image tag from firing on default Firebase events, such as screen_view or user_engagement, by blocking these events from the trigger.
- Create the image tag.
You can use any image URL for this. For example, we’ve used the DMPG logo image, as shown below. You then need to associate each Variable with a key which will be added as query parameters to the image request. Configure descriptive names for the query parameters so they are easily identifiable. In our example below “event” is used as the parameter for the Firebase event name and descriptive names are used for custom dimensions and metrics, such as “no_of_photos_uploaded” instead of dimensionX.
To start attaching the query parameters, add a question mark at the end of the image URL. Each key value paid will then be separated by an ampersand.
https://example.co.uk/wp-content/uploads/2018/01/dmpg_logo@2x.png?event={{Event Name}}&firebase_screen={{FBV – screen_name}}&screen_type={{FBV – screen_type}}&gclid={{FBV – campaign_gclid}}&gclsrc={{FBV – campaign_gclsrc}}&campaign_content={{FBV – campaign_tcAdcontent}}…

Be sure to also check the box to Enable Cache Busting. In short, this is necessary because the tag loads an image and images are cached in order to increase speed and reduce bandwidth usage. Consequently, the image will not be loaded a second time, unless the image URL is unique, which is where the gtmcb parameter comes in. This parameter will always contain a new and unique alphanumeric string.

- Publish the container
Important note: If you publish a change in the apps’ GTM container, in order to see the change on the app, you’ll need to either update the app or uninstall and reinstall it.
2.2 Configuring Charles
You’ll need to connect your device to Charles in order to see network requests from an App in Charles. The steps are slightly different depending on the device Operating System.
- Download the app on your Android/IOS mobile device.
- Please note: For IOS devices, when using development apps, there is an extra step you need to take.
- Connect your mobile device to the same Wi-Fi network your computer is connected to
- Download and install Charles from here then open Charles on your computer
- Open the “Help” section in the Charles menu,select “SSL Proxying” and then “Install Charles Root Certificate on a Mobile Device or Remote Browser”
- Follow the instructions shown in the pop up and an example of this is shown below (do not copy the IP address in the screenshot as it must be specific to your computer’s IP address):

- Follow these steps to configure your device to use Charles as its HTTP proxy :
- Android:
- In the Wi-Fi settings press and hold on the Wi-Fi network the phone is connected to until a menu pops up and select “Modify Network”
- Under “Proxy” select “Manual” and enter the proxy hostname and port shown in the Charles configuration steps pop up.

- Android:
-
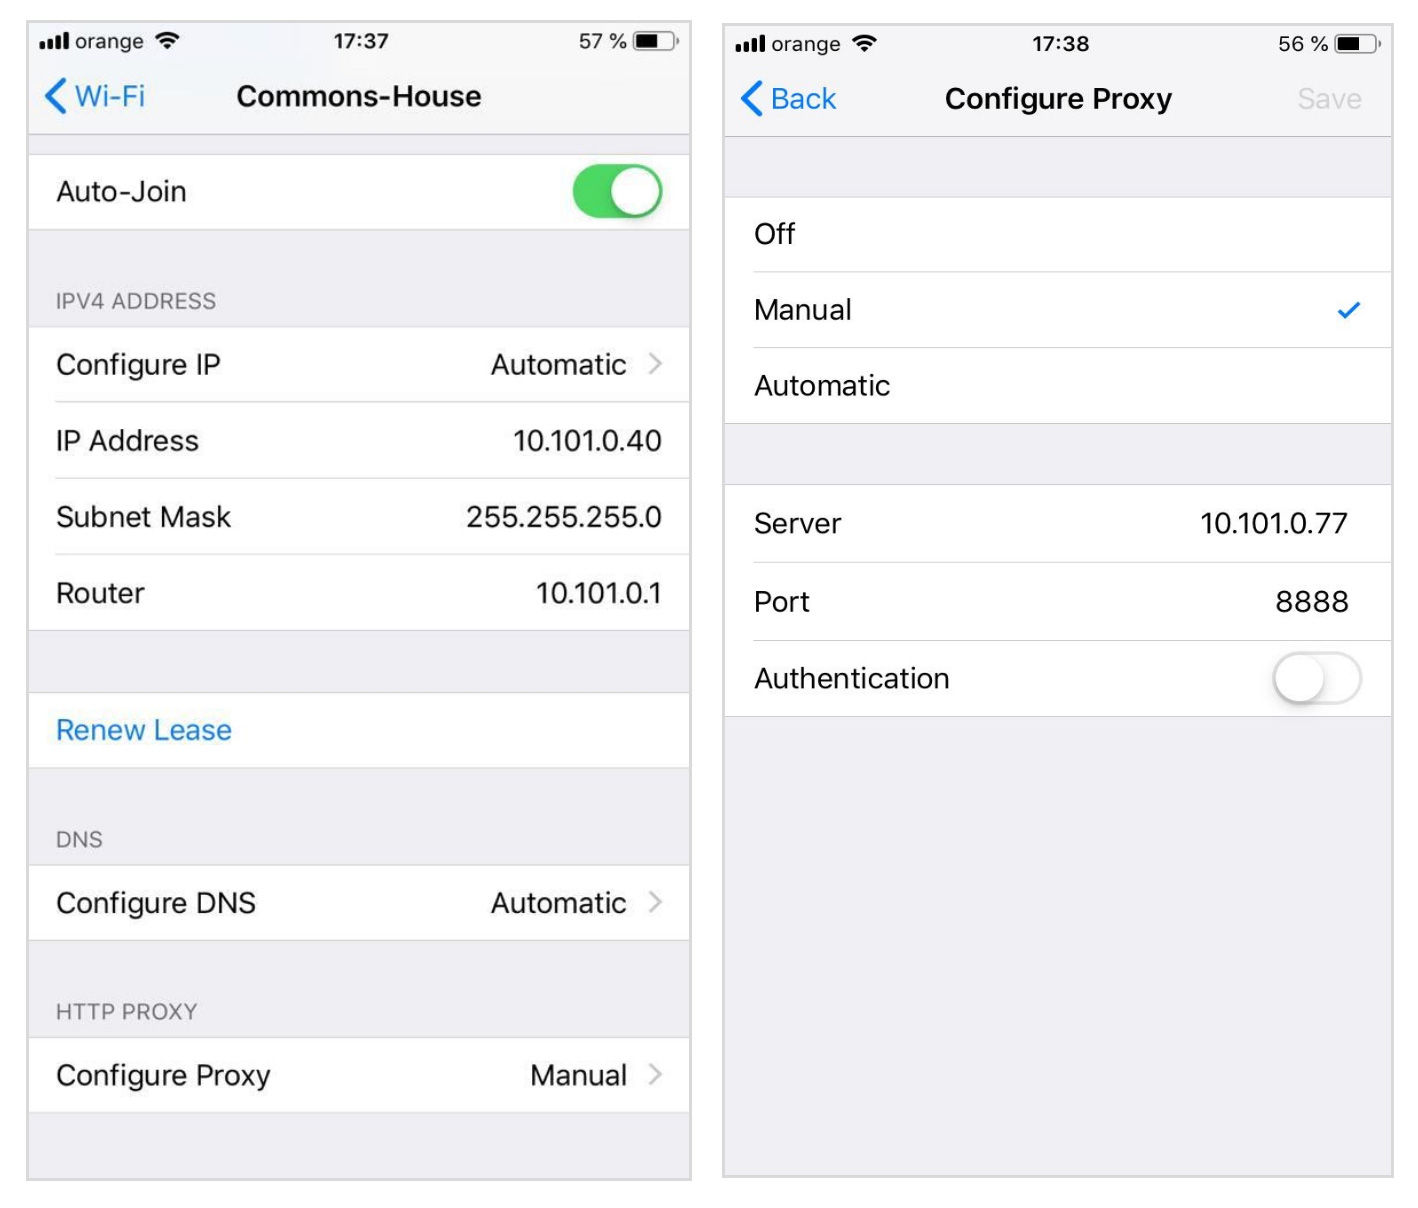
- IOS
- In the Wi-Fi settings select the blue “i” circle icon for the Wi-Fi network you are connected to and then scroll down and select “Configure Proxy”.
- Select “Manual” and insert the proxy hostname and port shown in the Charles configuration steps window.
- IOS
- Once you’ve navigated to chls.pro/ssl, downloaded and installed the Charles certificate on your device and trusted the certificate (instructions for this are shown in the pop up in Charles when you selected to install the Charles Root Certificate), a pop-up will appear in Charles asking you to allow the connection with the mobile device. Click “Allow”.
2.2.1 Charles and Android
Android apps need to be configured in order to trust the SSL certificates generated by Charles SSL Proxying. You will need to share this document with your app developers and request that they implement the code in the Android section.
2.2.2 Filtering in Charles
Any device connected to Charles will send all of its requests through Charles which can result in a large number of requests appearing and can make it difficult to find the image requests you’ve configured in GTM. In order to filter your requests you have 2 options:
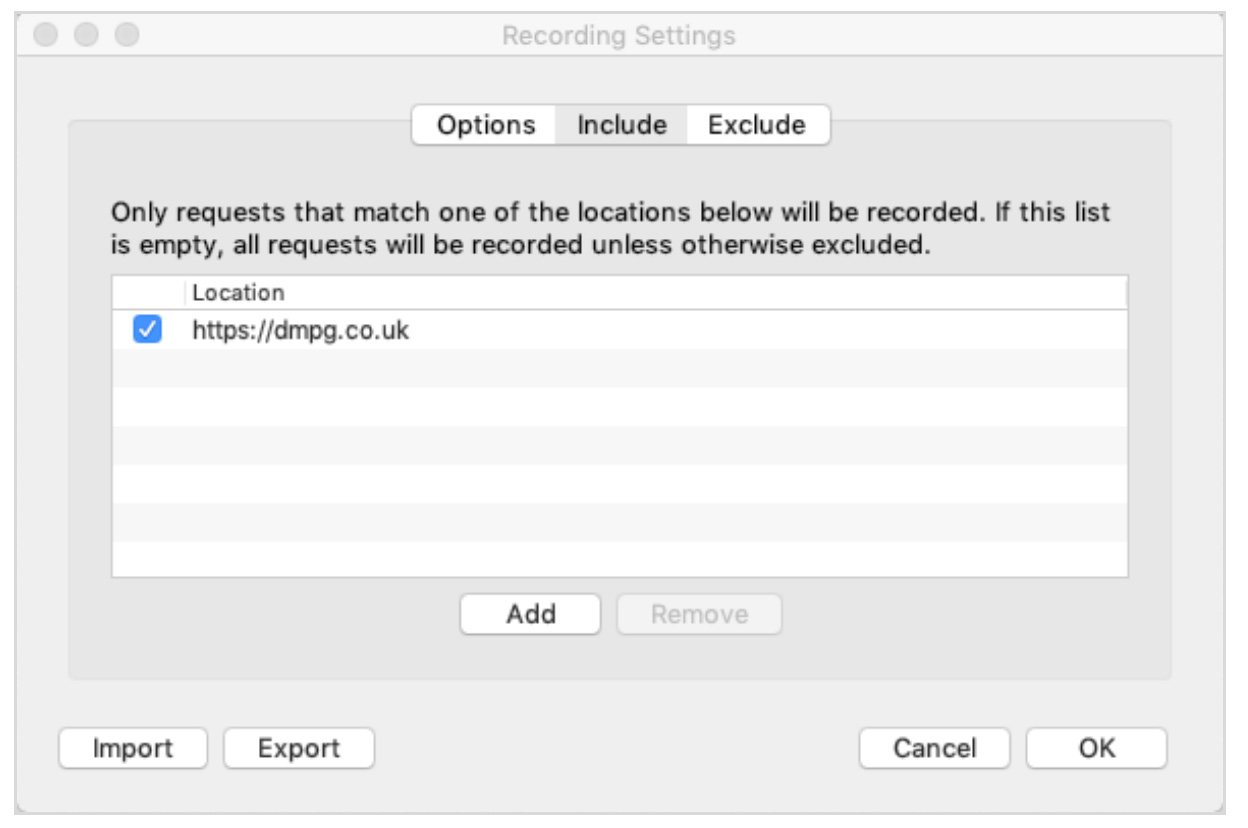
You can configure Charles to ignore any other requests expect for your image requests by following these steps:
- In the Charles Menu navigate to “Proxy”, then “Recording Settings”.
- In the pop-up window click on “Include”, then “Add”
- Select the protocol, enter the hostname you’ve chosen for your image requests and save
However this method can make debugging more difficult if your image requests are not coming through as expected. Therefore being able to see the status of the other requests can help you narrow down the possible issues with the image request, which is why I simply recommend using the filter shown below (note that regex can be used in this filter).

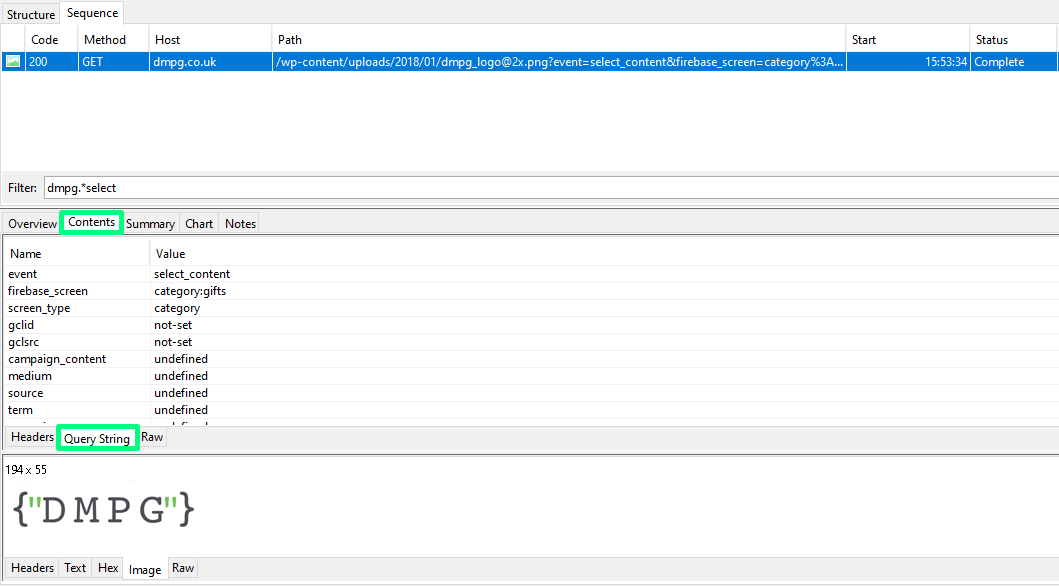
2.2.4 Seeing request parameters in a readable key value pair format
One of the advantages of this method is that unlike the Google Analytics requests, these image requests are not batched and therefore you do not need an additional tool to decode the batched requests. Each event comes through as an individual request and the parameters and their values can easily be seen in a readable key value pair format, directly in Charles. Just select your request → Click on Contents → Click on Query String.
3.0 Troubleshooting
Carrying out QA on an App is significantly more challenging than a data layer on a website and given that the process often involves more than one tool, issues can occur. This section will focus on the most common errors and suggestions to help you work through them for any of the QA methods mentioned in this article.
3.1 Using staging/development applications on IOS devices
On IOS devices, some applications which have not been downloaded from the App Store, cannot be opened unless the developer has been trusted on that specific device. In order to manually trust the developer follow these steps:
- Settings → General → Profiles & Device Management → Click on the Profile → Click “Trust”
3.2 Requests not coming through in Charles
If you are having trouble seeing the image requests in your proxy tool, here are some of the most common reasons and fixes for this issue:
- The mobile device is not properly connected to Charles
Be sure to recheck all of your settings, especially whether you’ve trusted the Charles certificate on IOS devices and that your filters are accurate.
- Requests are being batched
Requests could be batched together and have a significant delay in coming through, especially on IOS devices. You can either wait for a few minutes for these to come through or if you are not using preview mode, you can force the requests to come through by completely closing the app and reopening it. Be sure to close it completely and not just exit the app leaving it running in the background.
- The previous GTM preview mode was not ended
We’ve only experienced this on IOS devices however it could potentially occur on Android devices as well. If you’ve previously opened the app with a different preview link and not used the end preview link, this can interfere with the new preview mode in your next QA and prevent requests from coming through. This can occur even if in between the 2 rounds of QA the app was uninstalled and reinstalled. The best way to prevent this from happening is to always use the end preview link at the end of each round of QA.
3.3 “Client SSL Handshake failed: Remote host closed connection during handshake”
There are 2 common reasons for getting SSL handshake errors:
- On IOS, the most likely reason is that the certificate has not been trusted on the device. You must navigate to Settings → General → About → Certificate Trust Settings and trust the new certificate.
- On Android, the most likely reason is that the developers have not configured the app to trust the SSL certificates generated by Charles SSL Proxying. Review this section.
3.4 Features are not working in the app
Some applications may have features which cannot function as expected when using a proxy. For example, if the app requires localisation before proceeding further with a booking or an order, you can work around such issues by momentarily switching to your mobile data while you perform the action and then switching back to your Wi-Fi network which is set up to use Charles as a proxy and continue with the QA. Switching to your mobile data and then back to your Wi-Fi network should not interfere with your preview mode.
3.5 Error when trying to open the app using the preview link
If you get the following error: “Safari cannot open the page because the address is invalid” (for IOS) or the link simply does not open the app, you should first make sure that the GTM version was created and saved before you downloaded the application to your phone. If that was done, then the most likely reason for this error is that the GTM preview has not yet been enabled in the app by the developers.
- The instructions to do so on IOS can be found here.
- The instructions to do so on Android can be found here.
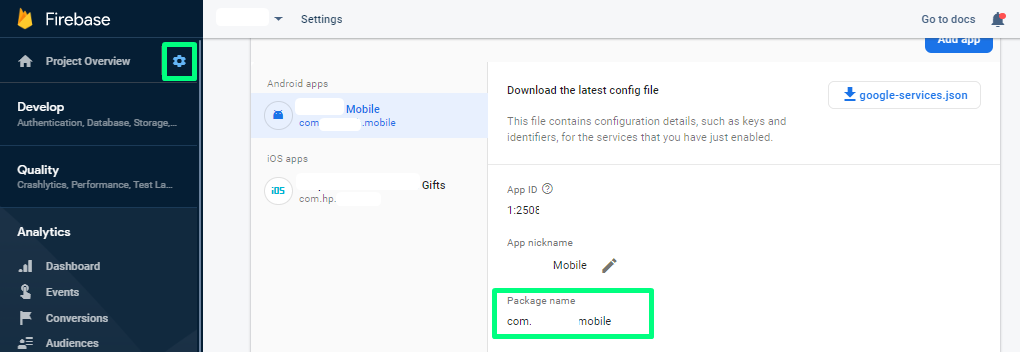
The package name can be found by navigating to the cog icon next to Project Overview – > Project Settings -> General – > Scroll Down to Your Apps -> Click on the Android or IOS app and get the value under Package Name (for Android) or Bundle ID (for IOS).

The QA process for any kind of tracking implementation is an essential step in ensuring accurate data collection. And although for apps the process is more complex, we hope this alternative QA method will come in handy and help you get one step closer to a successful implementation.