
A key benefit for users that run both Adobe Analytics and Campaign products is the Experience Cloud ‘Trigger’ functionality. It allows users to take advantage of the vast amount of customer data which their Analytics implementations already collect and easily use it to trigger and personalise emails, SMS and push notifications sent from Adobe Campaign (Classic & Standard). No extra client side configuration is required. Although setting up triggers to power a campaign seems a simple exercise on the surface, there are numerous factors which can complicate the process:
- The data collected in a trigger can be used for multiple purposes; from simply deciding whether a user should enter a campaign, informing which group of communications they should get or even dictating the exact content they receive in an email. Careful planning is required to ensure all data points needed to execute a campaign are collected.
- There may be multiple approaches for getting and using a piece of data needed for a campaign and a decision might be required about which is the most efficient.
- Successfully setting up triggers requires a collaborative cross-tool approach, and specialist knowledge of both Adobe Analytics AND Adobe Campaign (and potentially Adobe Launch depending on your use case). These product skillsets don’t often tend to be found in one person.
- The official documentation for triggers is… basic.
DMPG has configured and launched Abandon programs and triggers for multiple clients, and we have specialists across all 3 Adobe product offerings, so get it in touch if you want further information on this subject. The below framework helps us plan and execute Triggers.
Overview of the Trigger system
Setting up a trigger involves configuring Rules and Metadata. Rules can be built using similar logic to Adobe Analytics Segments. When a visitor meets the conditions in a Rule a trigger is fired and a XML/JSON packet is fired into Campaign containing basic information such as the Marketing Cloud ID of the user involved and the time of the trigger.
Any additional specified Metadata is also included in the trigger packet. If you select an eVar as Metadata, for example “Page Type,” the trigger will contain an array of ALL the pages that the user visited in the visit which met the trigger conditions.
The one exception to this rule is if you select Product dimension as Metadata. It would not be useful if you were trying to send a basket abandon email to get a list of all the products a user viewed in a visit – we are only interested in the ones they actually added to cart and didn’t buy. Fortunately, Product Metadata can be scoped to a particular event such as Cart Add. Note, when Product is selected as Metadata, the full product string is sent into the trigger complete with revenue and any merchandising evars or events.
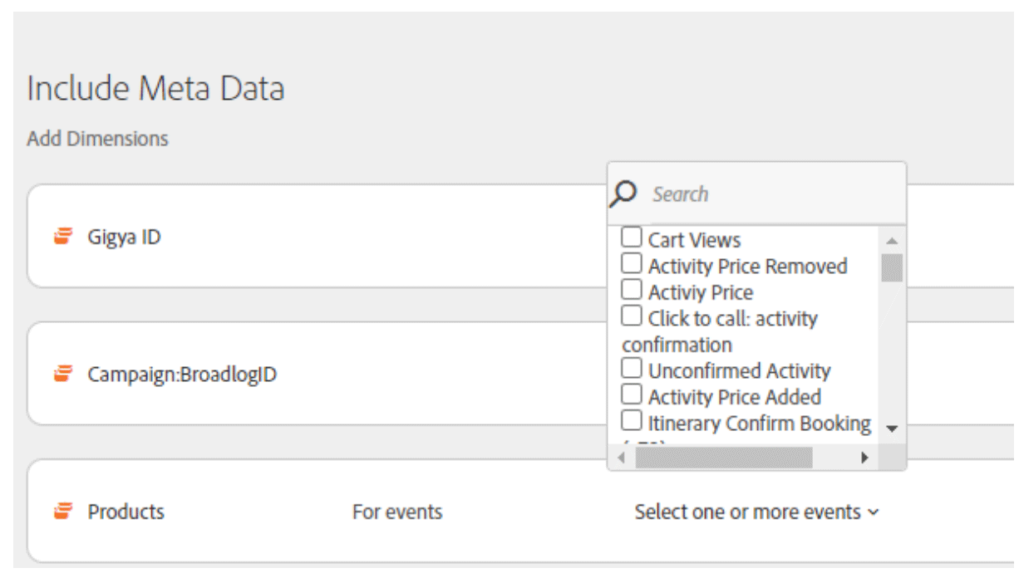
Fig 1. Scoping product meta data to a particular event
1) Design the campaign – Entry, Audiences, Content
Before we can design the trigger we need the full details of the campaign and emails/SMS the trigger will power. As a minimum we should have a user story which defines:
- Which website visitors should enter this campaign?
- Is there more than one audience/email group in the campaign? What dictates which type of email the user should get?
- What content should be in the email and which elements should be personalised? What dictates which type of content a user gets?
Worked Example: A campaign which sends users an email containing either swimwear or sportswear products depending on what they viewed for longest
Entry >> To be eligible to enter the campaign, in a visit:
User must have viewed either a sportswear or swimwear product page
User must not have added any products to basket
User must not have bought any products
User must have been logged in at some point in the visit
Audience >> To decide whether a user is in the swimwear or sportswear audience:
User receives the email relating to the product page they spent the most time on
Content >> To populate the correct image content into the email
User receives an email with the images of the products they have actually viewed
2) Scope the data
With a view of what we want to achieve with the trigger we can now work out what data is needed to make it all work. For each area, Entry, Audience, Content list out the data required. Once we have that list we can begin to work out where each data point is going to come from.
Some of our data will already be available in Campaign tables. For example we will need the user’s email address to send them an email, but we won’t be collecting that in the trigger. Other items we will specifically need to use the trigger as the data source – for example if the user has viewed a product page or not.
For certain items it is likely there could be 2 sources available. Take product image. You may already have an existing table in your Campaign instance containing your product catalogue which you can look up by SKU to return an image URL. If you don’t however you may need to collect this off your product pages via Analytics into the trigger, which in turn could mean further TMS or Data Layer configuration.
Other items on the list could be more complicated still. Take “time spent on product page.” You may be lucky enough that your implementation contains a ready configured “time spent on last page” dimension. The issue is that if we send that dimension into Campaign as metadata we will receive “time spent on page” for every page in that visit. Remember, in our example we only want to evaluate time spent on either the swimwear or sportswear pages. We cannot scope this dimension to a particular event unlike Product dimension. Additional processing is required.
The options you have for completing this additional processing are 1) perform processing outside of Campaign to ensure the trigger data arrives in the exact format we need OR 2) perform processing on the data inside Campaign.
Approach 1 is where the Launch TMS can come in useful to do the heavy lifting. By configuring a new eVar which only sends time spent on page when the page is a product page, we can ensure only the data we care about reaches Campaign, and all we have to handle in campaign is logic to return the highest value.
The second approach is to send 2 arrays of Previous Page dimension (time spent on page is sent after the user has moved off the page) and Time spent on Page dimension into Campaign as Metadata, combine them & store them in a table, and then filter that table down to only contain the pages we care about. This is probably going to involve a lookup into another table with the pages we care about. Over time depending on how large the table grows it probably isn’t going to be the most efficient approach here, and involves storing data in Campaign which we don’t actually have any other use for.
In summary at some point you are probably going to encounter a data point you want to use in a campaign which is not fully formed out of the box and requires additional processing. Launch can be a powerful option here to easily solve these kinds of issues, if you have access to that kind of resource, but the solution you opt for will depend on your exact scenario.
Worked Example: Data sources
| Component | Feature | Data Source |
|---|---|---|
| Entry | User must have viewed either a sportswear or swimwear product page | Trigger – Page Type evar |
| User must not have added any products to basket | Trigger – Add to Cart event | |
| User must not have bought any products | Trigger – Purchase event | |
| User must have been logged in at some point in the visit. | Trigger – Account ID evar | |
| Audience | User receives the email relating to the product page they spent the most time on | Trigger – new product page time spent eVar – Additional launch configuration required. |
| Content | User receives an email with the images of the products they have viewed | Trigger – product SKU scoped to product view > Lookup in campaign.products table |
3) Building the trigger
Now the planning is done, building the trigger in Experience Cloud is probably the easiest part. Make sure you choose the right type of trigger.
Abandonment triggers, wait a certain amount of time after a user has done or not done something, before returning the data for that visit.
Action triggers fire immediately when a user completes a specified action.
Session Start/End triggers fire immediately if sessions start or are deemed to have ended.
It is recommended that you carefully document the trigger build, in case someone changes it in the future and can not return it to its previous state.
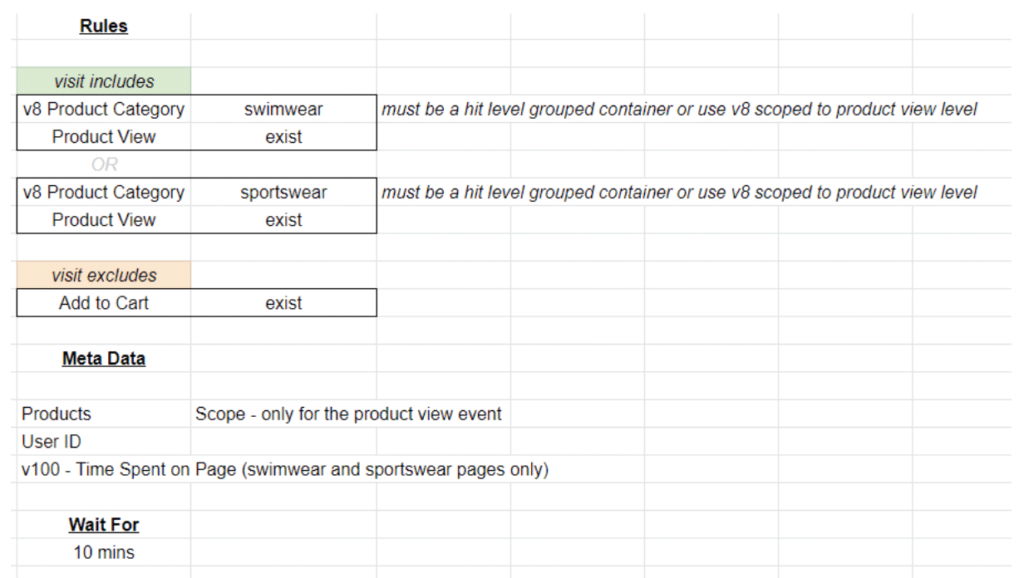
Fig 2. Example documentation for trigger build
4) Testing the trigger
Once you have built the trigger and set up the receiving pipeline in Campaign (a separate subject we will cover elsewhere) you will need to thoroughly test the trigger. Here are some tips we have from our experience:
- During our testing we have consistently found triggers to appear later than expected. E.g. a trigger designed to fire 10 minutes after a session end will usually appear around 17 mins after. This is likely variable based on Adobe server load perhaps. For this reason leave a good amount of separation between your tests so you can be sure what was what.
- Use incognito windows for testing. A trigger session is based on an Adobe visit as defined by an mcid. If you accidentally reopen a session before a trigger has completed its ‘wait’ period it will extend the time for it to fire and cause confusion. Using an incognito window and closing each time will ensure there is no chance a session can be opened again.
- Use an Analytics debugger to be sure that the Analytics events which the triggers require are 100% happening.
- Test all types of scenarios, including ones where the trigger should not fire.
- Film the testing sessions and record exact timings, you will appreciate the video footage when it stops you going crazy.
- Note your mcid for all testing sessions as this will allow you to match back into the trigger received in Campaign.
- Keep an eye out for any edge cases which you haven’t accounted for during testing. For instance our example implementation is not perfect – time spent on page fires on the subsequent page with the value for the previous page. As a result, the time spent will not be collected if the page is the last page in a users session. Testers and Campaign resources should be made aware of this.
Hooking up Triggers Inside of Campaign
Once you’ve got your trigger setup in Experience Cloud, you’ll then want to do something with the event and associated data.
If you’re using Adobe Campaign Standard then simply navigate to:
[Adobe Campaign Logo] > Marketing Plans > Transactional messages > Experience Cloud Triggers
From there on in, it’s quite self explanatory. The triggers (including data) you’ve setup are available for you to select and work with.
If you’re using Adobe Campaign Classic then things get a bit more complicated. You’ll need to configure the pipeline to pull the specific events and then process each event using a JS file. Only then can you do something with the data but this is all for another article and, in fact, is already explained well by the Adobe documentation here: